
Spring’s calling, the kids are buzzing, and you’ve got glitter stuck to your socks. Perfect. Let’s make some adorable DIY Easter crafts that don’t require an art degree or three trips to the craft store.
I’ll walk you through easy, cute ideas that kids actually enjoy making—and you’ll proudly display on the fridge, mantle, or let’s be honest, the kitchen island.
Supplies You’ll Actually Use (and Probably Already Own)
Want to keep it simple? Build a mini craft kit you can pull out in seconds. No drama, no panic runs for more googly eyes.
- Essentials: Construction paper, white cardstock, washable paint, school glue, scissors, tape, markers, crayons.
- Fun extras: Pom-poms, pipe cleaners, googly eyes, washi tape, felt scraps, cotton balls, stickers.
- Recyclables: Toilet paper rolls, egg cartons, cereal boxes, jar lids, paper plates.
- Protective gear: Table cover, smocks or old T-shirts, wipes.
Trust me—wipes are gold.
FYI: You can sub most “extra” supplies with paper or markers. Don’t let a missing pom-pom derail your crafting dreams.
Painted Egg Masterpieces (Without Dye Drama)
Save the vinegar-and-cups routine for later. Try these low-mess painting options that kids love and you can set up in 5 minutes.
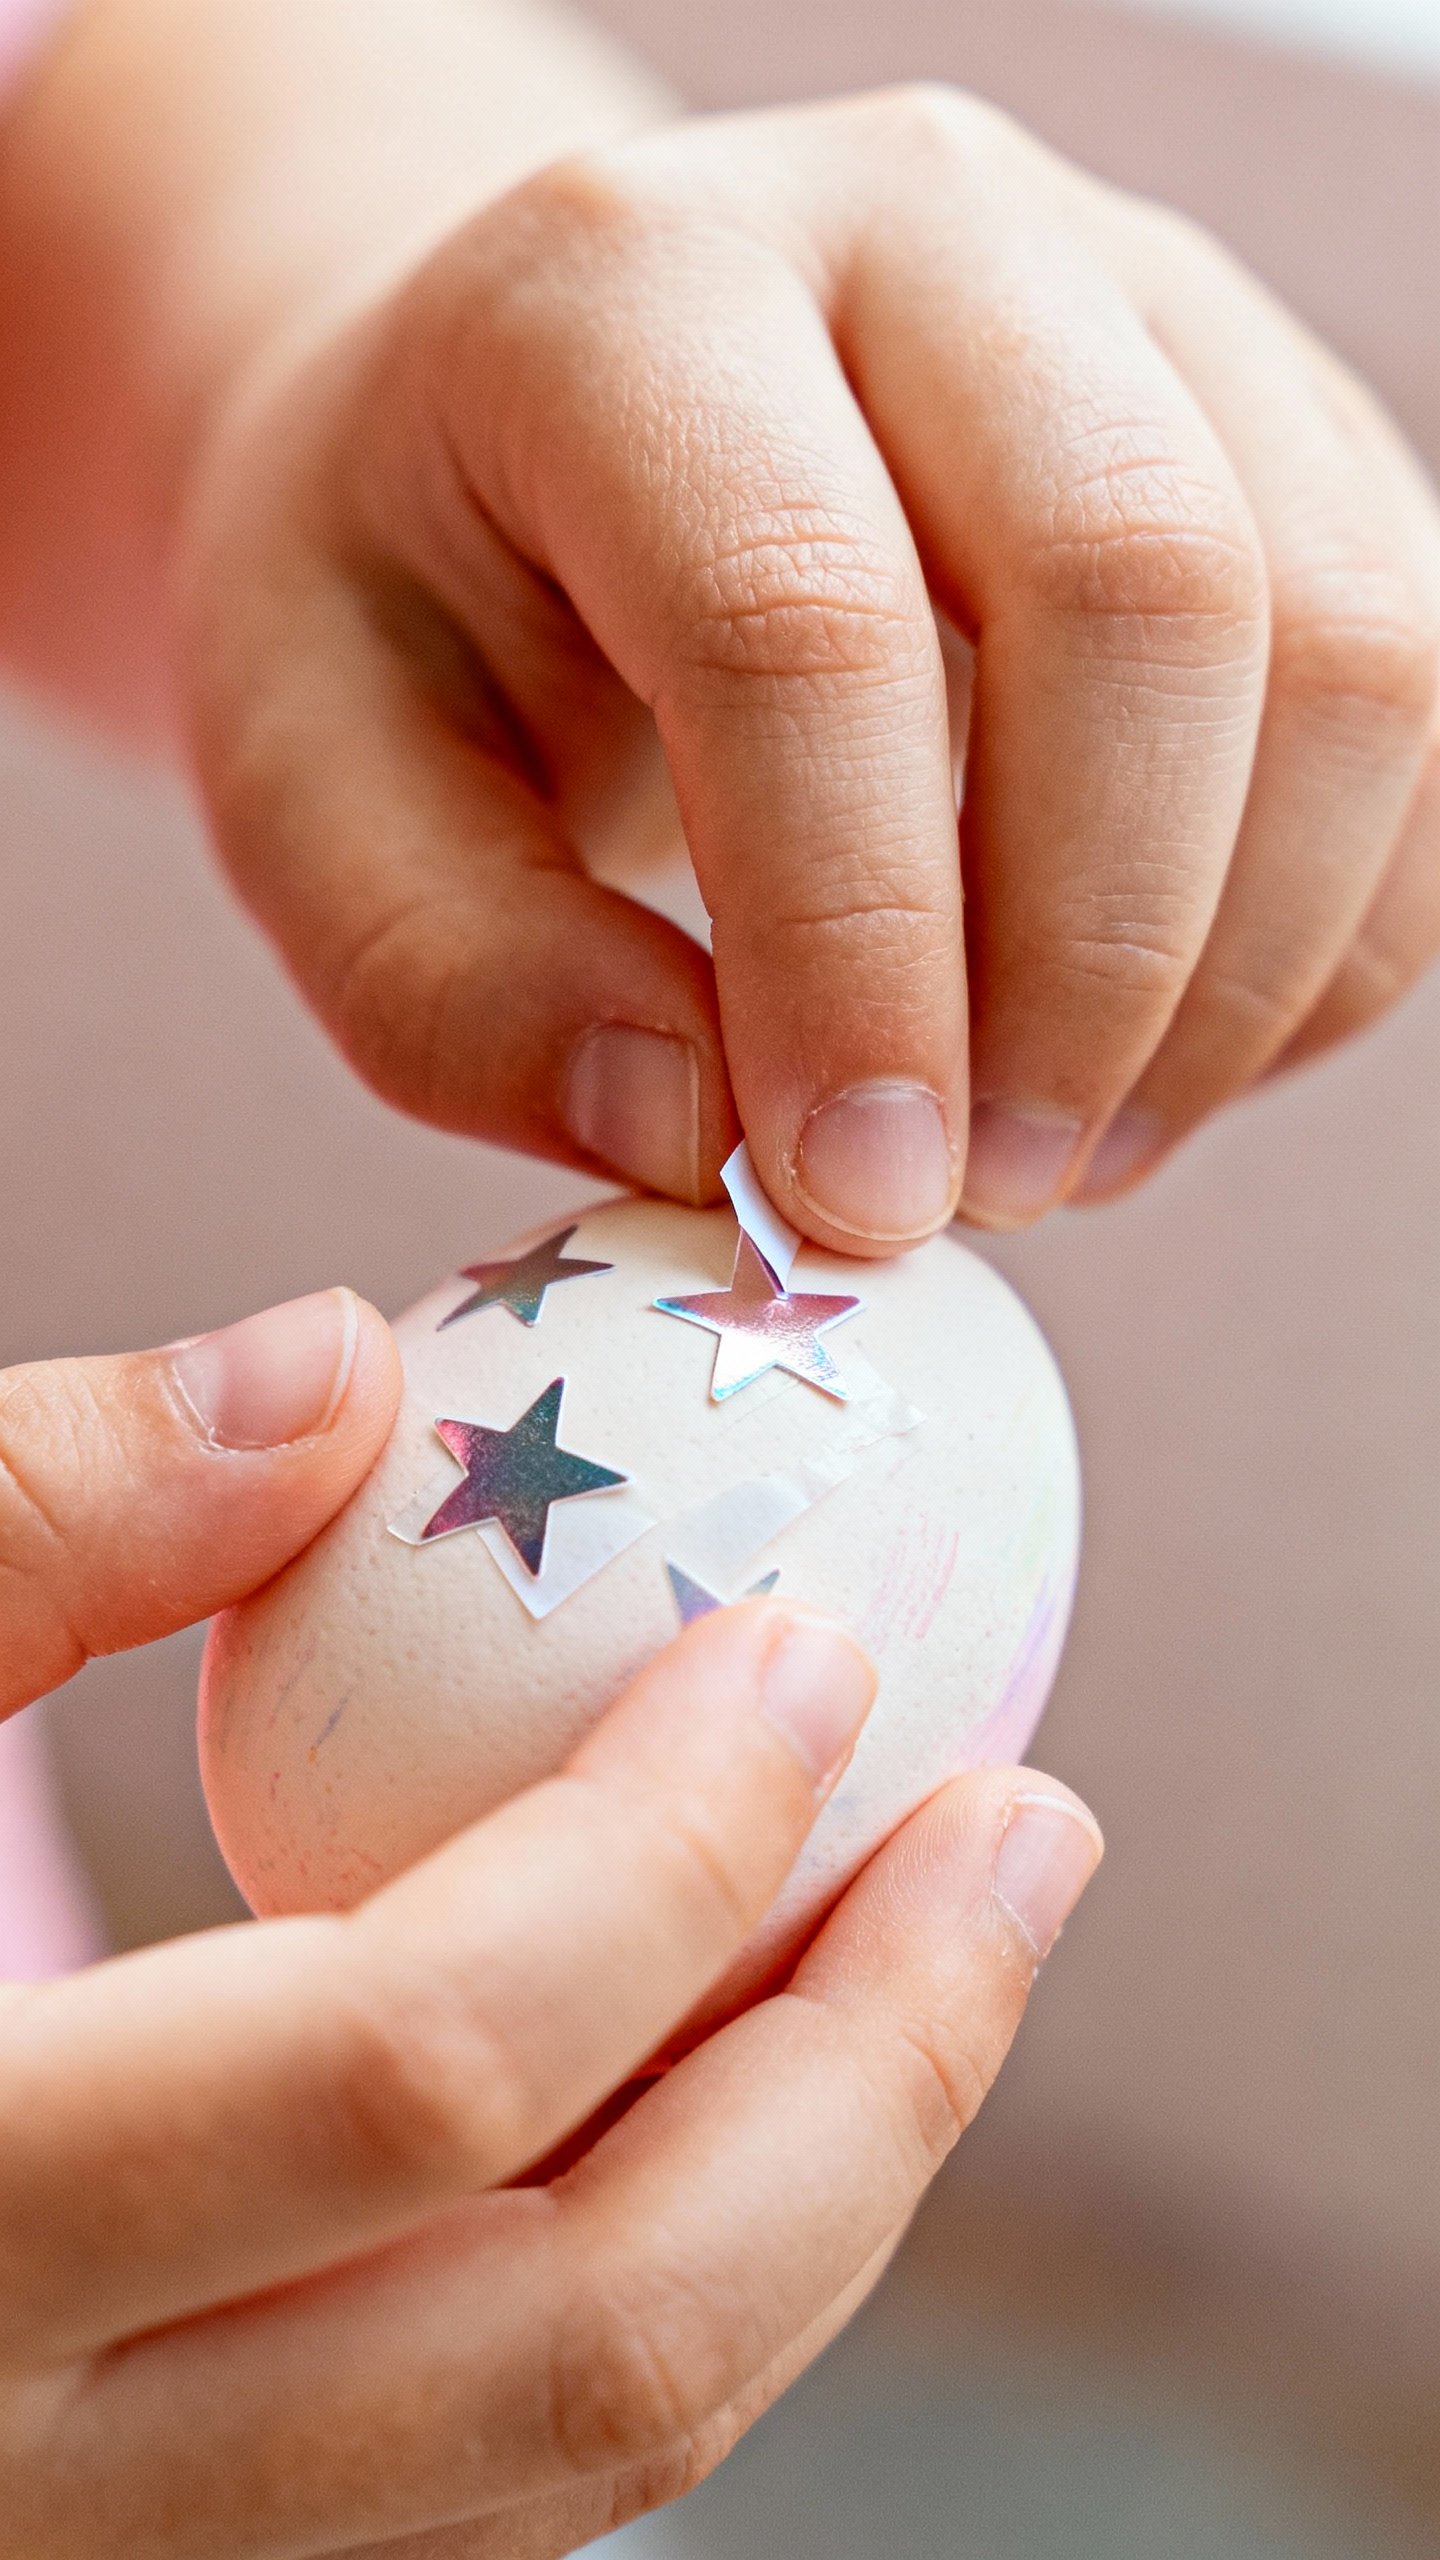
Sticker-Resist Painted Eggs
- Stick on dots, stars, or torn tape pieces to hard-boiled eggs or wooden eggs.
- Paint over everything with tempera or acrylic (for wooden).
- Peel stickers to reveal crisp patterns.
Instant “wow” moment.
- Pro tip: Use a clothespin as an egg holder to keep tiny painty hands off the egg.
Bubble Wrap Prints
- Wrap bubble wrap around a rolling pin or kid-safe bottle, paint it lightly.
- Roll over paper egg cutouts for satisfyingly dotty patterns.
- Add a name banner and hang on a string for a cute garland.
- Why it works: Texture keeps little hands engaged and mistakes don’t exist here.
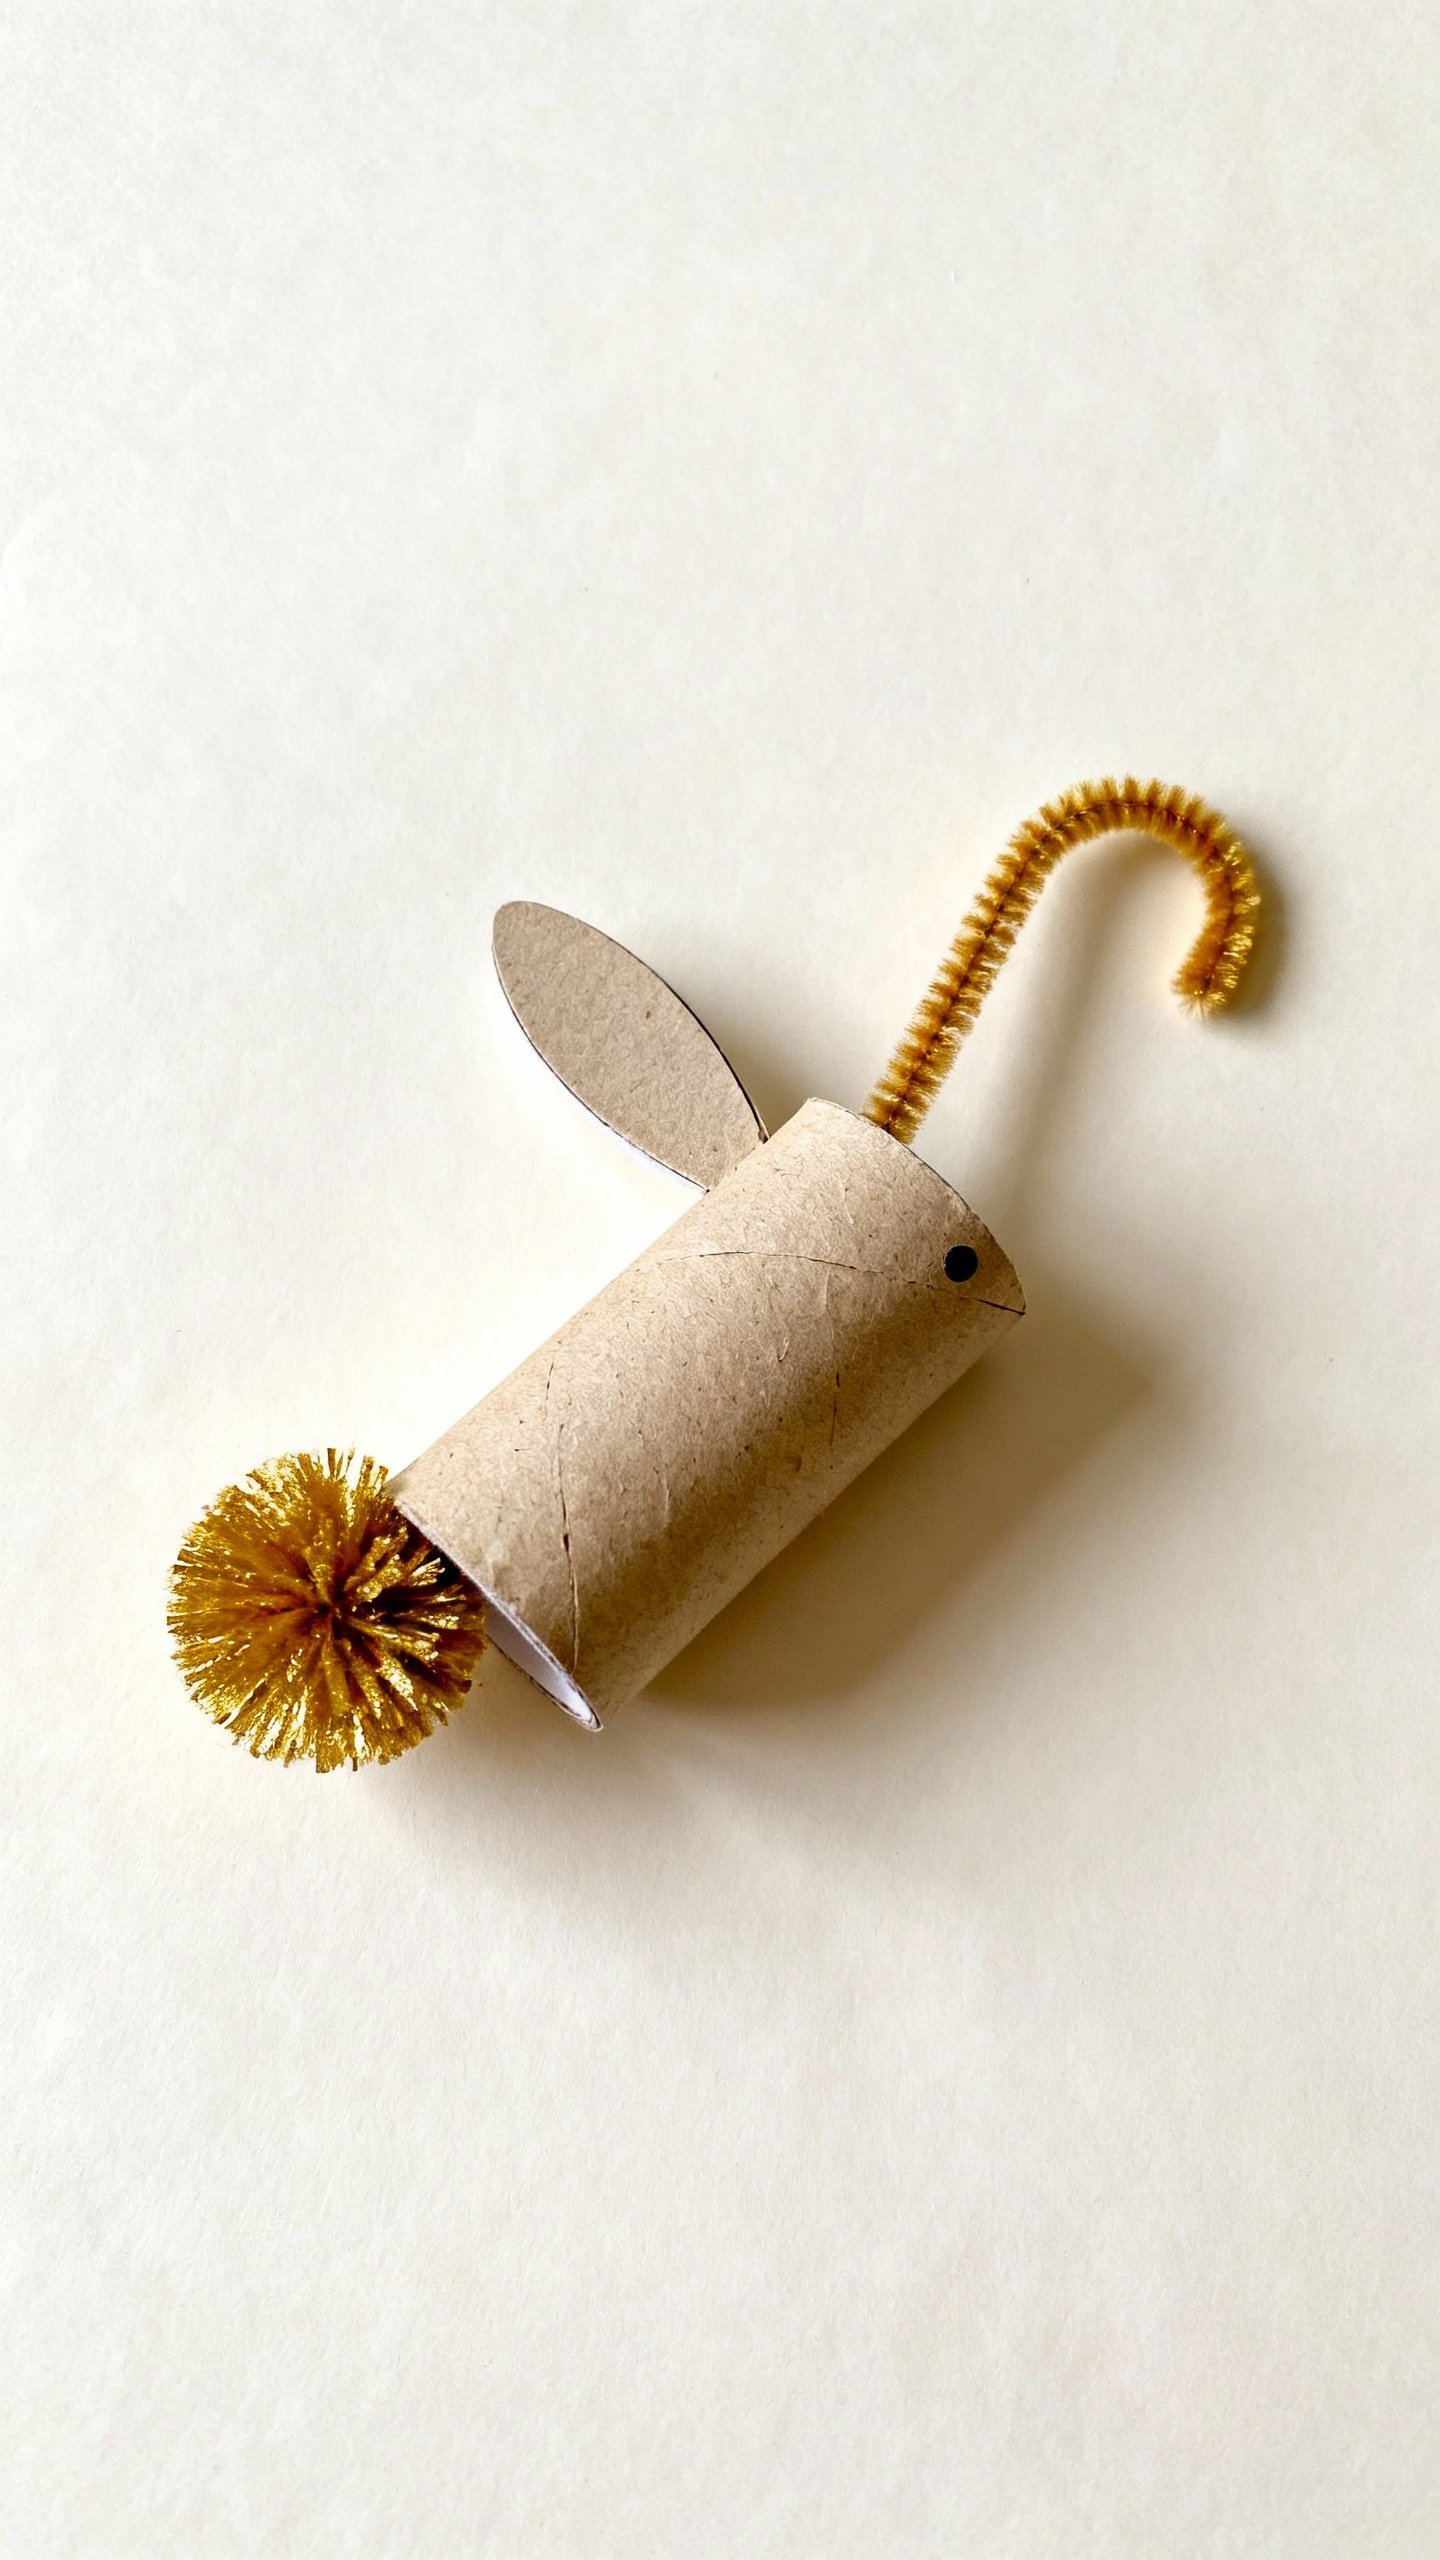
Toilet Roll Bunnies & Chicks (Recycling for the Win)
Toilet paper rolls transform into adorable Easter characters faster than you can say “craft stash.” These stand up on their own, which feels like a tiny miracle.
TP Roll Bunny
- Paint the roll white or pastel. Dry for a few minutes.
- Glue on paper ears (white outside, pink inside). Tape them inside the roll’s top edge.
- Add a drawn-on nose, whiskers, and googly eyes.
Stick a pom-pom tail on the back.
- Make it a basket: Poke two holes and add a pipe cleaner handle. Drop in mini eggs or paper “carrots.”
TP Roll Chick
- Paint the roll yellow. Cut out orange paper beak and feet.
- Glue on feather “wings” from paper or felt.
Add eyes.
- Optional: Cut a zig-zag white “eggshell” crown for the top—adorable factor: high.
IMO, these make perfect table place cards. Write names on the front and call it decor.
No-Sew Pom-Pom Easter Garland
Make your house festive without going full Pinterest-mania. This garland works across mantles, windows, or doors.
- Cut egg and bunny shapes from cardstock or felt.
Keep them palm-sized.
- Decorate with stripes, dots, tiny bows, or stickers.
- Glue mini pom-poms as bunny tails. It’s the cuteness clincher.
- Use a hole punch at the top and string them on twine or yarn.
- Quick hack: Skip the hole punch and use clothespins to clip shapes to the string. Zero drying time.
Egg Carton Critters (Budget-Friendly and Adorable)
That empty egg carton?
Goldmine. Each cup becomes a tiny creature. The kids can customize an entire farm or forest.
Ladybug and Bee Buddies
- Cut out individual cups.
Paint red for ladybugs, yellow for bees.
- Add black dots or stripes with a marker.
- Glue on paper wings and pipe-cleaner antennae.
- Storage idea: Pop them back into the carton to keep them safe and “living” in their little condo.
Hatching Chick Surprise
- Use two cups: one for the chick, one as a cracked eggshell lid.
- Paint the chick cup yellow and add eyes and a beak.
- Cut jagged edges on the white “shell” cup and stack it on top.
Open and close it for endless peekaboo. Toddlers will do this 89 times. Minimum.
Paper Plate Bunny Masks (Instant Pretend Play)
Craft + costume = guaranteed giggles.
These masks take minutes and turn into an afternoon play session.
- Cut eye holes in a paper plate. Attach a craft stick handle at the bottom.
- Glue on tall paper ears. Add a pink inner ear and a pom-pom nose.
- Draw whiskers or tape on skinny paper strips for extra drama.
- Upgrade: Add a cotton-ball “muzzle” around the nose for a 3D effect.
- For tiny kids: Skip the eye holes and make a photo prop instead—easier to hold, zero complaints.
Pastel Salt Dough Keepsakes
Feeling sentimental?
Salt dough ornaments double as gifts for grandparents. They also keep kids busy for a while—win-win.
- Mix 2 cups flour, 1 cup salt, 1 cup water into a dough. Knead until smooth.
- Roll to 1/4 inch.
Cut egg, bunny, or carrot shapes with cookie cutters. Poke a straw hole if you want to hang them.
- Bake at 200°F (93°C) for 2-3 hours until fully dry. Cool completely.
- Paint with acrylics or tempera.
Seal with Mod Podge if you want them to last forever-ish.
- Memory idea: Make a tiny footprint or handprint bunny. Add ears and a face after baking. Heart-melter.
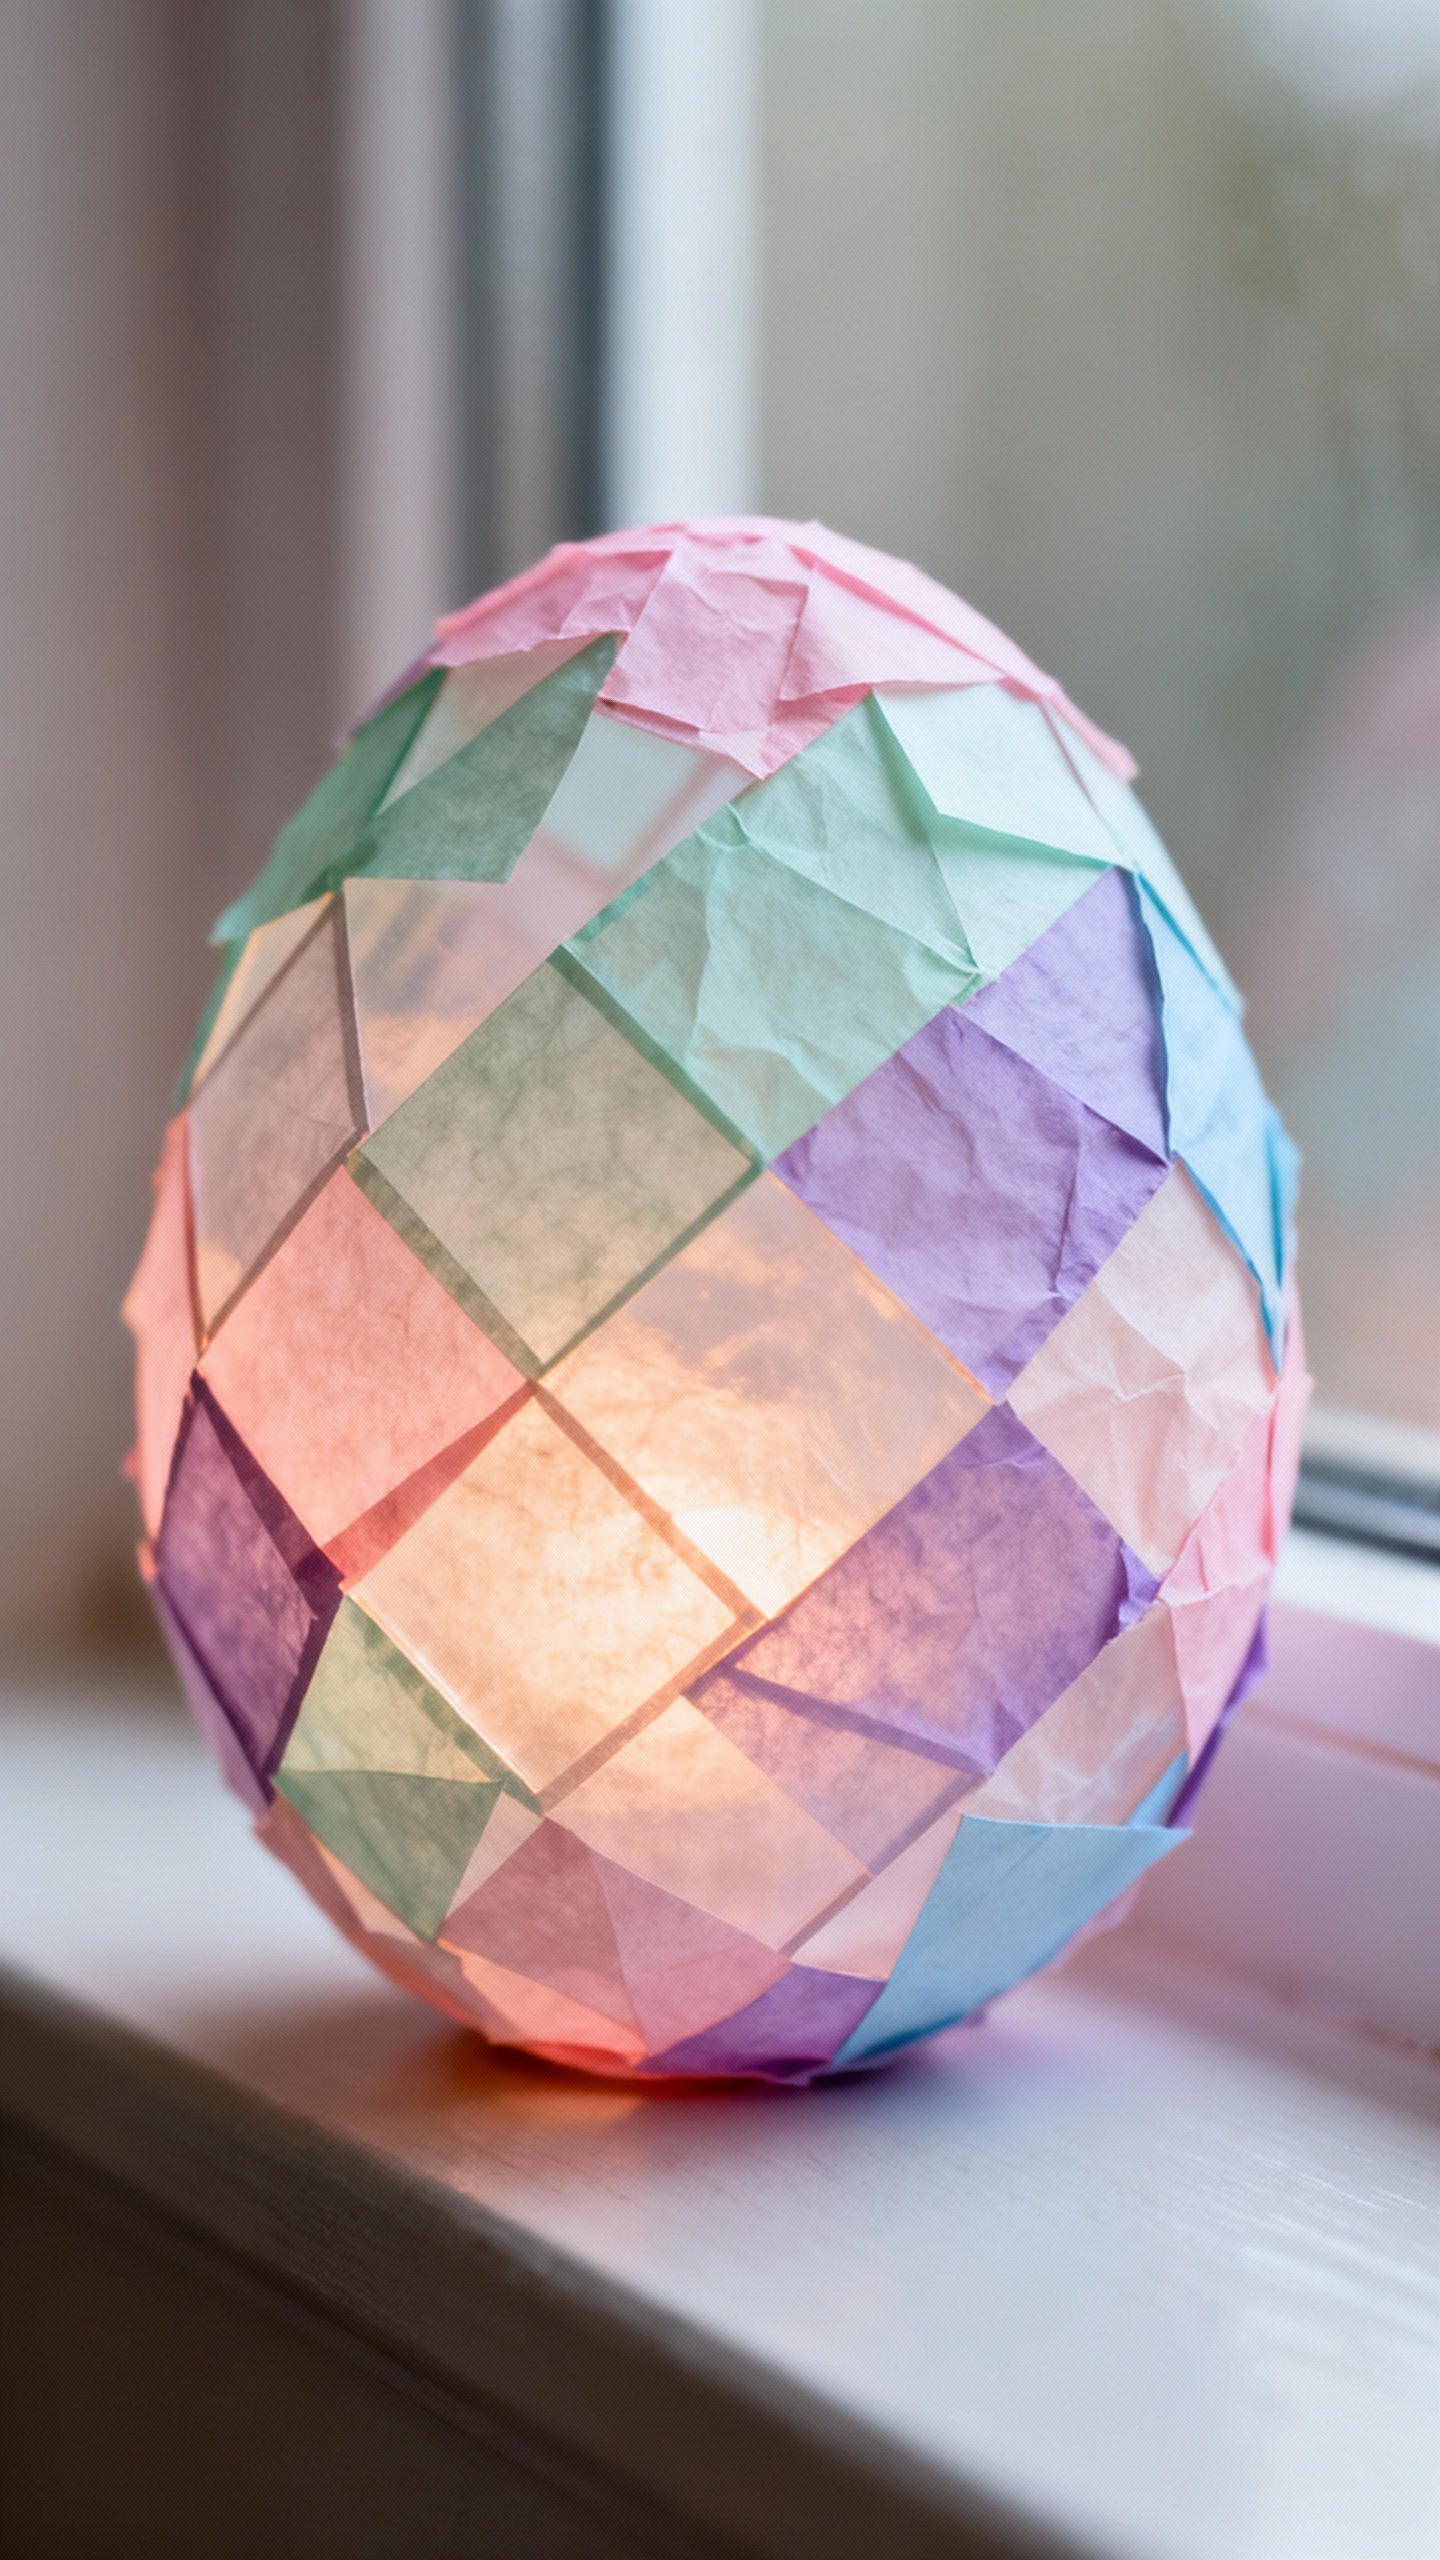
Tissue Paper Stained Glass Eggs
Window art that glows in the morning light?
Yes, please. Minimal mess and lots of “ooh” factor.
- Cut egg frames from black construction paper (like a big egg with the middle cut out).
- Stick the frame onto clear contact paper, sticky side up.
- Layer tissue paper squares in pastel colors over the opening.
- Seal with another piece of contact paper and trim the edges.
- Variation: Make a bunny silhouette in the center before adding tissue for a cool shadow effect.
FYI: No contact paper? Use glue sticks and wax paper.
Not as neat, still very pretty.
Quick Crafts for Short Attention Spans
Need a five-minute win? These deliver instant gratification without sacrificing the cute factor.
- Sticker Story Eggs: Kids decorate big egg cutouts with stickers and draw a mini story around them.
- Washable Marker Eggs: Draw patterns on hard-boiled eggs, then lightly blend with a damp cotton swab for watercolor vibes.
- Carrot Treat Bags: Fill orange tissue in a snack bag with mini snacks, twist the top with green ribbon “stems.”
IMO, you keep attention by keeping pace. Prep the next step while they finish the last—no gaps, no chaos.
Keeping Craft Time Sane (and Fun)
Let’s be real: kids craft like joyful tornadoes.
A few small tweaks keep your house somewhat intact.
- Set zones: Paint station, glue station, drying zone. Traffic control = fewer spills.
- Pre-cut when needed: Trim shapes ahead for toddlers. Older kids love doing it themselves—hand them safety scissors.
- Batch it: Make multiples of one craft and turn it into a garland or gift set.
Efficient and satisfying.
- Celebrate happy accidents: Smudges become clouds. Crooked ears equal personality.
FAQs
What’s the best glue for kids’ Easter crafts?
School glue handles most paper, pom-poms, and felt. For heavier stuff like wooden eggs or thick cardboard, use tacky glue.
Hot glue works best for fast results, but only with adult help. Washable options keep cleanup painless.
How do I make these crafts toddler-friendly?
Go big and simple. Use large shapes, chunky stickers, and pre-cut pieces.
Swap paintbrushes for sponges or dot markers. Focus on process, not perfection—if they smear, it’s still art.
Can I make eco-friendly versions?
Absolutely. Use recyclables (rolls, cartons, cereal boxes), natural dyes for eggs (beets, turmeric), and paper decorations instead of plastic.
Reuse ribbon and twine, and display crafts so they don’t turn into instant clutter.
How do I store finished crafts without drowning in glitter?
Choose favorites for display and photograph the rest. Create a seasonal folder on your phone and print a collage once a year. Keeps memory guilt low and surfaces clean.
Win.
What if I don’t have fancy supplies?
You don’t need them. Substitute with what you have: draw eyes instead of googly ones, cut yarn for whiskers, use crayons instead of paint. The point is the fun, not the supply list.
How long do these crafts take?
Most take 10–30 minutes, plus drying time if paint or glue enters the chat.
Salt dough needs baking, but the hands-on part is quick. Keep snacks nearby to bridge any waiting.
Conclusion
Easter crafts don’t need to be elaborate to feel special. Pick a couple of ideas, set up a simple station, and let the kids lead.
You’ll end up with quirky, colorful creations—and maybe a new family tradition. And hey, if glitter hits the floor, that’s just festive confetti, right?
Explore More on FreeKidsHub
Jump into your favorite category for easy printables, fun activities, and family-friendly ideas — all in one place.
Tip: Add this block to the end of every post for stronger internal links ✨